Monday, January 31, 2011

How (I like) to sew sweater flowers


After trying a no-sew, no-glue sweater flower approach, I decided to branch out a little. I enjoy sewing and this is one of those projects for which you don't need a sewing machine or fancy stuff or a lot of space. Anyone can do this with just an old sweater, a needle and thread, and some scissors.

There's no end to the different ways you can make a sweater flower. Lots of people have done it. Lots of people sell them. I honestly have no idea who did it first, but one link trail on the spiral method led me back to something Martha Stewart reportedly made out of paper over a decade ago. I think I will start with links to some of my favorites that others have done...

June Pfaff Daley shows how to glue spiral method flowers
This brooch tutorial from Betz White is just awesome

My first attempt at a sweater flower was the spiral method. It seemed the easiest. Start by cutting a spiral from a circle like this.


Then you could wrap it starting from the outside (that little point can be cut off later).


Or you could start on the inside, for a different look.


For this one, I decided to go back and cut wide, irregular notches all along the spiral (but you could do rounded petals, slits, or whatever).


This is how it stacked up pre-sewing.


One thing that's important to me while sewing is that the thread is *not* doubled. This will allow you to pull the needle off when you are done and start on a new flower, and when you decide what you want to sew your flower onto you can re-thread the needle with that already-attached thread and you're set. Anyway, when I sewed it I jumped all around the flower, sewing over and behind a layer here and there. This pinches the fabric down and gives the look of individual petals without extra cutting.


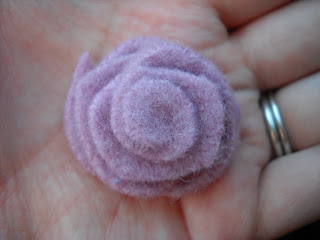
It ended up like this. This is pretty much what I have, in red, on my Valentine's shrug. On most of those I cut a really big spiral but didn't go all the way to the center of the circle. This makes it so the flower doesn't look so flat in the middle, and to me it looks more rose-like.


All the flowers I've made so far have been different, because all of them have been improvised. Sitting down with a bunch of pretty colors and the scissors and just experimenting for an hour or two is fun! There are thousands of possibilities.

You could cut off the bottom edge of your sweater...


And make a little roll for the center of your flower.


And then you could cut some petals like this...


And roll it up so it looks nice and sew through all the layers, from one side to the other, back and forth until there are stitches around the whole thing.


Which would turn out about like this.


You could fold up one of those leftover circle pieces...


And roll it to make a center like this. (Ha! There's Jordy driving. You can even do this in the car; I did!)


And add pointy petals like these...


To create this.


You could use multicolored sweaters.


You could use several different sweaters that are all different colors. You can add leaves or not (this one is a pin I made for someone recently).


A button or bead could make a pretty center for your flower. You can keep adding petals until the flower is huge!

And then there are all the different things you could decorate with those flowers. Aside from the obvious headband/hair clip, I plan to completely cover the inside of Baby Robert's plaster belly cast with them, and then lay him in the middle of all those flowers and take pictures. I'm also stashing a bunch of flowers to decorate various handmade Christmas gifts for next year. Gotta get ahead!

Anyway, there are endless possibilities and this is a fun creative project to try out while we wait for spring. So get yourself some shrunken sweaters and get started!

Friday, January 28, 2011

Valentine's Day upcycled sweater shrug


As I was felting up my latest batch of thrifted sweaters, I came across this light pink one that was cashmere and so soft. Because cashmere never seems to felt well anyway, and it was my size after washing and drying, I really wanted to wear it.

Except... Hole.


And? Belly.


So I decided to try making something that would take care of both those problems and turn the sweater into something I could wear. A flower-embellished shrug! First I put the sweater on and cut a little hole to get it the right length for me.


And then I took it off, laid it flat on the cutting board and sliced it off evenly.


So I had this to work with, and I cut a line straight up the middle in the front.


I picked it up with those cut edges together and laid it back on the cutting board.


And I cut it evenly on both sides, like this.


Then I rounded things up a bit.


Next I had to hem around it. Because cashmere, as I said, usually doesn't felt well, it was necessary to roll the edge under so no raw edges were hanging out after it was sewn. While I was at it I stitched up the hole in the neckline. All this took a few minutes, but I like to save time by threading as many stitches as I can on the needle at once.


I had to put some tucks in the back, because otherwise it would've been too loose at the bottom. I just folded in about an inch or less in two places on the back, and then stitched up the dart that each one made.


The buttonhole is the one thing I wish I'd done differently. I need to work on my buttonhole skills, because I have none. I wish I'd done a tie or something instead, but I decided to cut a buttonhole and use one of the flowers as the button. I made the flower and sewed it on first, so I'd know what size to make the hole and where to put it.


It looked kinda funny with just those two roses (one covering the hole and one for a button), so I kept adding more until it looked right.


The flowers, by the way, are easy and fun to make. I just thought adding pictures of that would be too much for one post. I'll post about how I did that in a day or two, but if you need to know now you can google "how to sweater flower" and hit images and get a ton of ideas. It's nothing that hasn't been done before. All the flowers I made for this sweater were some variation on the spiral method, and you get different results depending on how you cut. It's fun to experiment.

I'm glad I did this project because it affirmed my belief that success starts with scissors. Even if I ruin a bunch of craft supplies and turn out a finished item that's totally embarrassing, I learned something. I'm one step closer to making something that is decent. I am going to have to post a picture of my multicolored upcycled wool poncho attempt from last week. Scary!

But this time I actually ended up with something I'm not afraid to wear! So go ahead and make that first cut even if it might be wrong.


P.S. I decided to enter this project in a fun contest:


One Month To Win It

Wednesday, January 26, 2011

WW: Made so far this month


There is just something about working with construction paper and Elmer's glue.


I like to think of Wordless Wednesdays as days with less words. Kind of like the Payless shoe store. We drove by one when I was a kid and I asked my mom how they could afford to run a business giving shoes away. But it turns out you do pay, you just pay less.

I googled and figured out how to sew roses, got in a Valentine's mood, and made this bracelet.


Then I decided to have craft day and make some hearts to hang up like Megan always does. Suzi learned to cut paper hearts (and glued on some I made for her) to make Valentines. This one is for her friend Aiden because his favorite color is blue.


And she got creative and made herself a little bird beak from the scraps.


Ivey mostly made a mess, climbing up on the table and crushing her goldfish crackers (not pictured) with her fat little knees.


But she was really cute doing it. She also enjoys drawing pictures with her "cayns."


And right after it snowed we made chocolate cupcakes from a mix and frosted them with sweet whipped cream. Which the kids mostly licked off and left the cupcakes.


Working in the car and at home, I finally finished these birds for my in-laws. I added a nest and two little eggs, one for Jordan and one for his brother.


And this might be my favorite... A shrug made from a holey cashmere sweater and another red sweater I felted. Both were purchased at the Goodwill clearance center for, I don't know, a couple of bucks total. Roses are fun to make. Post of the process from this one coming soon.